Introduction
Nowadays, we see projects with a variety of requirements. As such, there are various tools to fulfill a plethora of scenarios. One such tool is a Headless CMS.
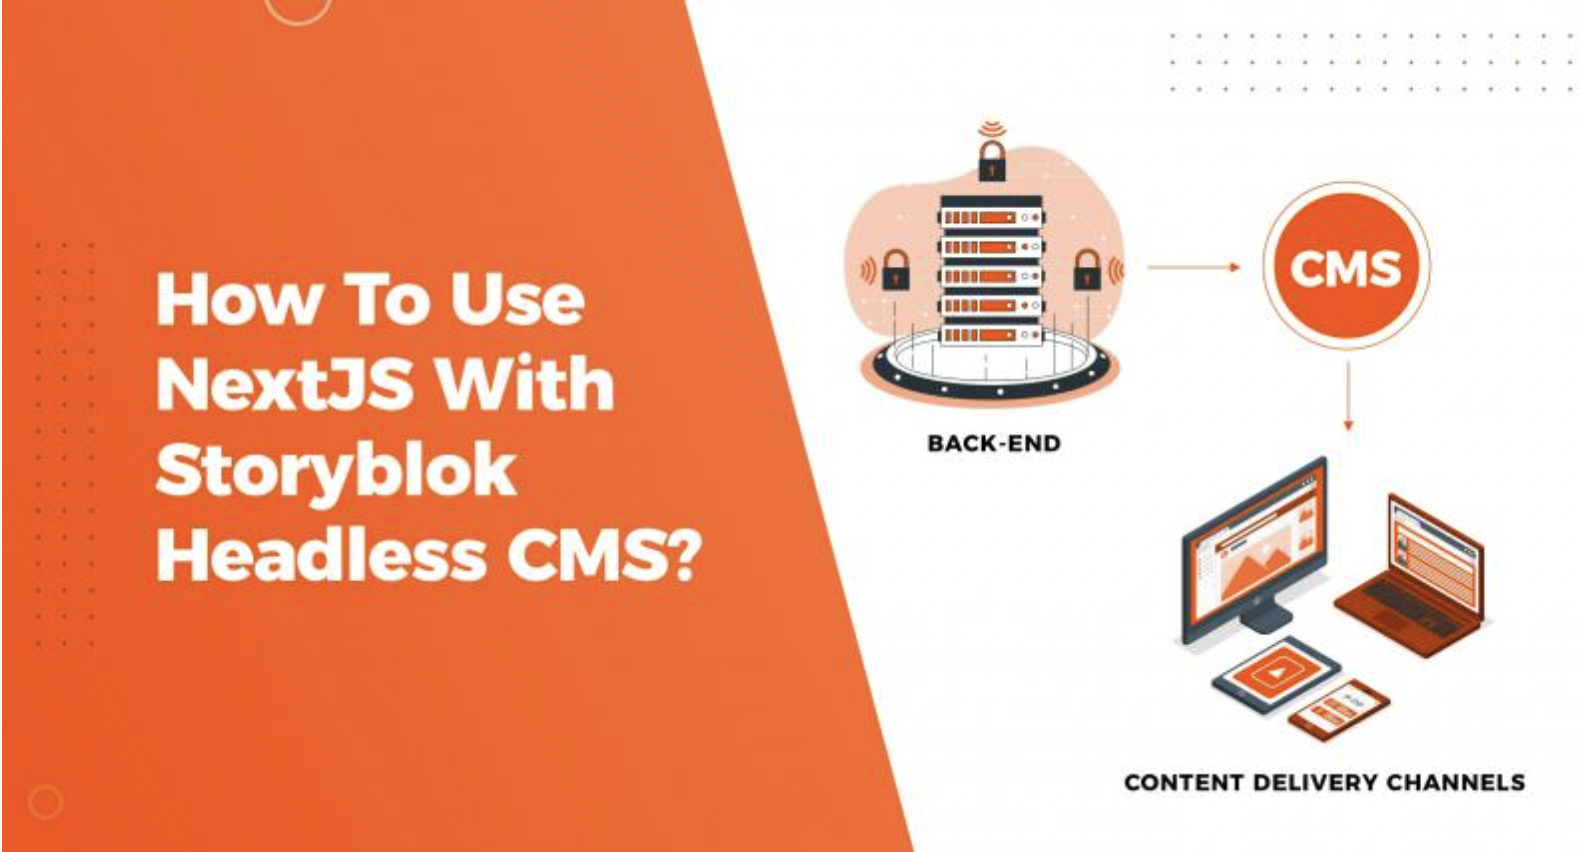
We are sure you’ve heard of CMSs like WordPress or Drupal. If you notice, these tools provide a complete package: frontend and a backend. However, we may need something more flexible. A Headless CMS provides only the backend, allowing you to work with a frontend setup of your choice. That’s what we did, and that’s what we talk about in this blog post.
For this experiment, we’re using a headless CMS, Storyblok, that fetches stories and provides blocks that you can place where you see fit, making it easy to create, place and visualize the content you create.
Workflow Setup
We chose Headless CMS (Storyblok) and a frontend framework of our choice (Next.js) to see how the workflow would be. It’s relatively simple to set up and get started. Next.js was our frontend framework choice as it provided a lot of performance enhancements and Server-Side Rendering, along with offering SEO benefits. Though this post talks about Next.js, you’re free to use another framework if you wish.
We’ve opted to use Tailwind CSS, a popular CSS framework that provides classes for various CSS rules to make our workflow even smoother. No more managing multiple CSS files; just add the classes you need on the element you want them on, and we’re done! You can even create classes of your own if you find the default classes unsuitable for your requirements. Tailwind also purges unused CSS, so you’re only using the CSS used, resulting in smaller file sizes, faster load times, and an overall better experience.
Backend: Adding Content
What Is Storyblok Headless CMS?
As mentioned before, we’re using headless CMS Storyblok as our backend solution. Storyblok is a Headless CMS that allows you to create components that can even go into other components that eventually become pages. It provides us with a storyblok API to request any data we need, returning it as JSON.
Setting Up Headless CMS (Storyblok)
We need to do a couple of things first to set up Storyblok headless CMS to work with our front-end.

- Head over to Settings on the left menu and go to the General Tab. First, we need to provide a default environment. This is the server on which we would serve our files. In our case, we served our files at localhost:3000, so we’ve entered that here.

- Next, we need to get the Preview key. This secret token is what we use to connect our Storyblok space and make requests for data. This must not be shared with anyone, as they could potentially gain access to your site.
An easy and secure way of using this is to create a .env.local file, create a key, like SECRET_TOKEN, and add the Preview key as the value. This file can be added to .gitignore so that only people who are authorized can access the key. To get this value, you can use process.env.SECRET_TOKEN.
With this, our basic setup of Headless CMS, Storyblok, is done, and we can proceed with creating our site.
Storyblok Components
Storyblok headless CMS deals with components. Each Storyblok component has a type. Though Storyblok has provided a couple of types for us to get started, we’re most likely to create our types with their own set of fields.

To create a component, head over to the Content tab on the left. It should bring up a page with a list of components. This is where we would create our components. On the top right, you have options to create a Folder or an Entry. The Entry is our component, while the Folder allows us to keep things organized.
Creating A Component In Storyblok: Example
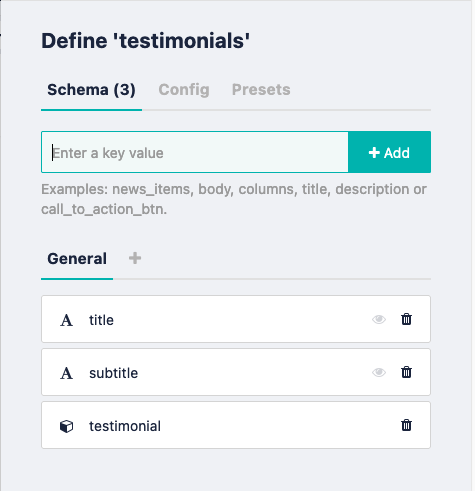
Let’s try creating a component. Suppose we want to create a testimonials component with title, subtitle, and testimonial fields.
We can add them by entering their name and adding them to our Schema. Now, anytime we need a testimonials component, we can use this, giving us a component with these three fields.
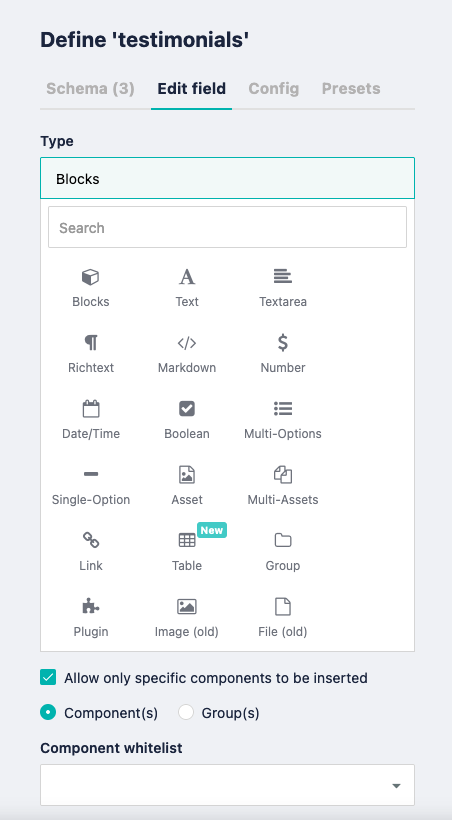
Say, we have a Testimonial component, and we want to list multiple testimonials. We can create a field; we’ll call it testimonials for now. As you can see here, we can choose from various field types, but for now, we will have it accept values of type Blocks.
We can set the type of Blocks we would like to accept here, so we will set this to Testimonial. We can set more than one type, but for now, one shall suffice. We can even set the maximum number of blocks that could be provided.
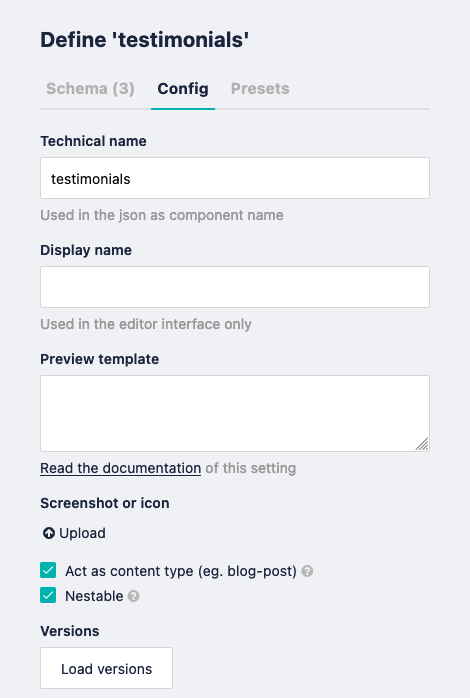
One thing to note here is we need to check the Nestable checkbox in our Testimonial component to select Testimonial as a Block type here. It allows our block to be called from inside another block. To do so, select the component and go to the Config tab. At the bottom, you will find two checkboxes, set the component to be Nestable in another component.
Note: Do this in the child component (the component you want to add in another component).
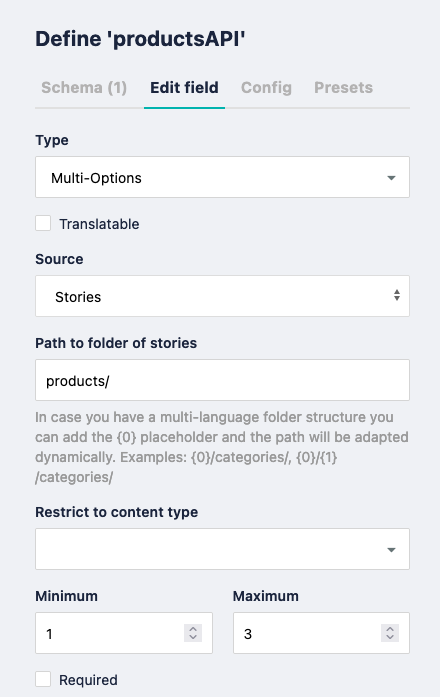
We can even have a scenario where we get stories from a specific one directory within Storyblok. A Story is like a component that holds data. It’s up to us how we want to render it.
The difference between a Story and a Component is subtle, yet they each serve their purpose. Let’s say we have some products that we’d like to fetch. We only want to get products in a specific folder.
- We can create a field of type Multi-Options and select Stories as our Source. This enables this field to look for stories in a specific folder, which we’ve set as our products folder containing all our products.
- Once we call this component, it lists all the stories it could find in this folder, and we can choose the stories we’d like to display. This is a convenient approach for things like products, news, events, or anything else, where you would like to store multiple stories of a certain type in a single folder.
Response Structure
Here is an example of how Storyblok headless CMS structures the data. This is the data that we would receive when we make API calls to Storyblok. In this case, we’re looking at the JSON structure for the testimonials component.
Note: We only need to focus on a subset of this data. As you can see, there are some default fields provided by Storyblok.
Under story->content, you can see our custom title, subtitle, and testimonial fields. title and subtitle take text values, while testimonial takes blocks.
A field of type Blocks always serves an array, regardless of the number of blocks. In each array entry, we’re provided with the JSON of that component. In this case, we’re only served the values under content for that specific component so that we won’t get the default fields.
Bringing Components Together
Storyblok headless CMS provides us with a UI for adding components. In this example, we’ve opened our Home component. Here, we have a body field that accepts blocks. It is the default schema provided to us by Storyblok under the Page component type, but you’re free to use a custom setup if you wish.
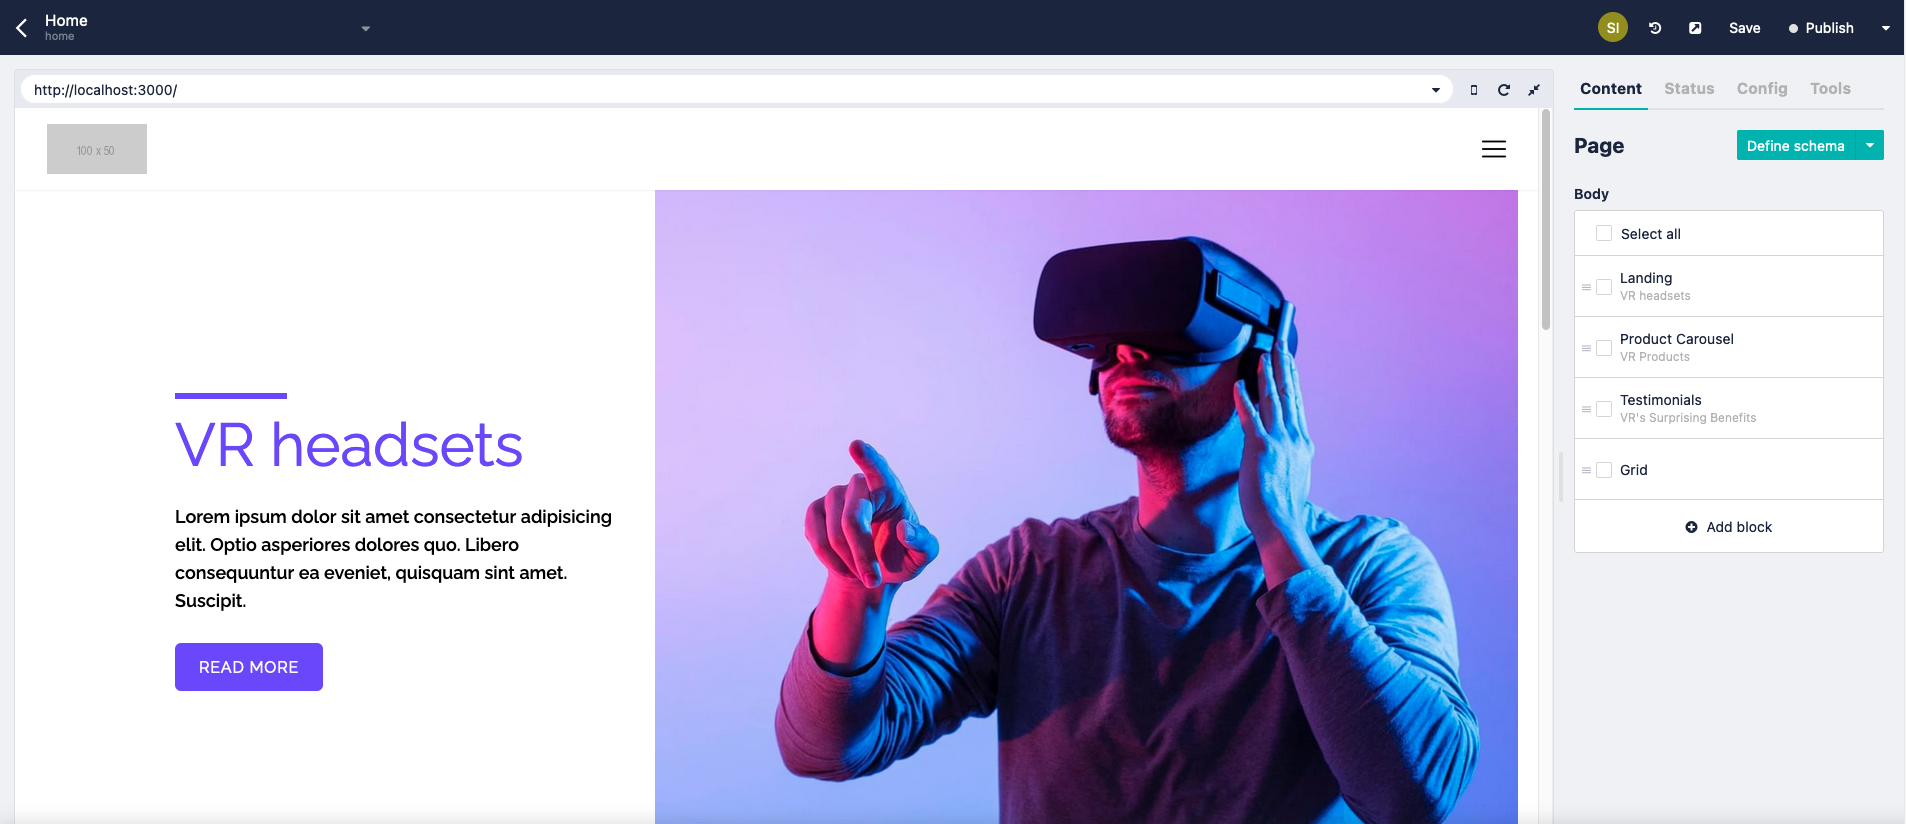
You can choose any component you want here and can even set the order in which they appear. However, you may notice that the order doesn’t change on the left. That may be because we’ve hardcoded the layout in our frontend development implementation.
Storyblok provides an example here, where they provide code for a DynamicComponent.
- It allows you to look for a component type and link it to a component you created.
- Based on what component it gets from the backend data, it renders the respective component.
- Finally, you just need to call the DynamicComponent component for each component you get from the backend on the homepage.
If you’ve followed the article correctly, you should be able to change the order of components on the right and see them load accordingly on the left.
Frontend: Rendering Components
Next.js is our front-end framework of choice for reasons we’ve already mentioned in our Introduction. Since Next.js is built on React, the syntax is quite similar. However, a few Next.js specific things need to be done to take advantage of its features.
Creating Components
We start by creating the individual components. This allows us to split the website down into multiple components and tackle them one by one. We want to create a Button component, and I already have a component in the headless CMS, Storyblok.
If this is the data we receive from the backend, creating a component is relatively easy.
As you can see, we’ve created a React component. It has a containing div, inside which is a link. The SbEditable component that’s wrapping all of our code is a feature provided by Storyblok headless CMS, where you can see your changes live, as well as modify the component from the UI itself. We’ll talk more about this later.
The required data is coming from the data key in our props. You might be wondering how we’re getting this data. This data is usually called once at a page level. Then, we iterate through every component we receive, passing in the correct data and rendering accordingly. This JSON button would likely be part of a much larger JSON structure. To learn more about how to fetch the data, you can visit Storyblok’s article, which guides how to set up Storyblok and NextJS to work with each other.
Advanced Features: Next.js + Storyblok
1. Dynamic Routing
Dynamic Routing is a feature provided by Next.js that allows us to render pages that follow a specific URL structure reasonably quickly.
For instance, we have multiple products, and each product has its page, but the layout of the pages is precisely the same, with only the content changing to match the specific product.

The image on the left shows the directory structure for our pages in the Next.js project. And the image on the right shows an example of a page that follows a similar directory structure.
In Next.js, we can create a page that takes a variable. Note that the folder structure on our Next.js and Storyblok projects has to match. In this case, the page we’re looking for is in the products folder placed in the root directory. In the case of Next.js, pages are the folder being served, so we treat it as root.
2. Visual Editor
Storyblok provides us with a Visual Editor, making it easy to add/edit/remove/rearrange blocks. However, they also provide us with a neat feature called Storyblok Bridge. The Bridge connects the Visual Editor more tightly with our code, allowing us to make layout changes from the Visual Editor itself. Let’s see what that looks like.

With the Storyblok Bridge enabled, we can see certain components faintly highlighted. These are the components that are wrapped by the SbEditable component. You might’ve seen this earlier, in our Button component.
This is a feature that allows us to enable a certain component to be manipulated in the Visual Editor, provided that the Bridge has been set up and is running. The Bridge runs based on whether we’re running in Preview mode or not.
We can easily set this up by creating a couple of preview URLs in Storyblok. Please refer here for a guide on how to set up Preview Mode. We end up with a Preview URL and an Exit Preview URL. Since Storyblok uses cookies to store the preview value, we can enter Preview Mode using the Preview URL, but we must enter the Exit Preview URL to exit Preview Mode.
Here’s a video that shows you how Storyblok Bridge works.
3. Fetching Stories
There may be cases where it makes sense to pull data from stories rather than create multiple components. Storyblok allows us to do that. You may remember a field type of Multi-Option, where we get stories data in a specific folder. While this is a neat feature, Storyblok headless CMS only provides us with the IDs of the stories. It’s up to us to use the IDs to get the data.
Here’s the approach we used:
- We parse the data and access the main field. In this case, it’s the body field.
- We then find the index of the object we need, find the component we need, and for each ID, we fetch the respective data and add it to an array, which is added to the object we found earlier.
- We then return this newData.
- The getNewData function needs to be called and stored in a different variable while we’re fetching data.
- This is the data that finally gets returned and used throughout the page.
Conclusion
After a fair bit of experimentation and playing around, it’s safe to say that this type of workflow is completely viable. Using a different front-end and back-end solution, teams can use tools they’re most comfortable with to get the job done.
Storyblok headless CMS is quite flexible, allowing us to create components and pages the way we want. A quick setup process also allows you to get into the Storyblok headless CMS quickly.
The documentation is fairly robust, supplemented with documentation written by the Storyblok team to help us and show us what else Storyblok can do. It’s a lot of fun working with Storyblok and Next.js.

Ahsan Nazir, Frontend Engineer - L1
A sci-fi movie buff who occasionally enjoys comedy, Ahsan spends his free time playing games on his computer or phone and hanging out with friends. Helpful and curious by nature, his hobbies include photography, cooking, and traveling.
 We respect your privacy. Your information is safe.

Leave us a comment