Introduction
Setting up Salesforce Marketing Cloud is not easy. According to user reviews on Gartner Peer Insights, organizations struggle to set up Salesforce Marketing Cloud and often run into challenges like:
- Complex integrations with other systems and data sources
- Difficulty in ensuring accuracy, completeness, and consistency of data
- Lack of skilled personnel for configuration and customization
These challenges can be solved by following a thorough step-by-step implementation checklist. You can also reach out to our Salesforce implementation experts to help set up your Salesforce Marketing Cloud.
Checklist For Implementing Salesforce Marketing Cloud Engagement
Follow the checklist given below to streamline the Salesforce Marketing Cloud implementation process.
Pre-Requisites: Four Key Questions
Before implementing Salesforce Marketing Cloud Engagement, organizations must answer four questions.
Question 1: What are your business goals?
Clearly define the business goals. It can include increasing customer engagement, building better email marketing campaigns, boosting sales, or improving digital experiences. Clear goals will guide the implementation process and help determine the required features and functionalities.
Question 2: What are your success metrics?
Outline the metrics for measuring the platform's success. These could include increased customer engagement, a higher conversion rate, or a lower customer churn rate.
Question 3: Who are the primary stakeholders?
Identify the primary stakeholders who will be a part of the implementation process. This could include IT professionals, marketers, and executives.
Question 4: What will be the timeframe for the platform implementation?
Estimate the time it will take to fully implement the platform. Consider the time needed for setup, testing, and training.
4 Phases Of Salesforce Marketing Cloud Implementation
The following phases will help implement all the required Salesforce Marketing Cloud Engagement components.
Phase 1: Account Configuration
Organizations should follow the given steps to configure their Salesforce Marketing Cloud account.
Step 1: Identifying the Tenant
Tenants help organizations understand the structure of their SFMCE account. These tenants vary depending on the edition of Salesforce Marketing Cloud Engagement.
|
Tenant Type |
Description |
|
Enterprise 2.0 |
The tenant will be a top-level account. It will also include all associated business units. |
|
Enterprise 1.0 |
The tenant will be a top-level account. It will include Lock and Publish or On-Your-Behalf Business units. |
|
Core |
The tenant will be a single account. |
|
Agency |
Every top-level account and every associated client account will be a separate tenant. |
Step 2: Verifying The Account Name And Member Identification Code (MID)
Organizations will receive an initial name and a unique Member Identification Code (MID) when their SFMCE account is provisioned. This MID identifies the account. Organizations can have a single or multiple MIDs depending on the edition.
To check the Username and MID, click on the ‘Setup’ option and then Navigate to the ‘Account Settings.’ Here, the MID will be present as the Account ID along with the account name.
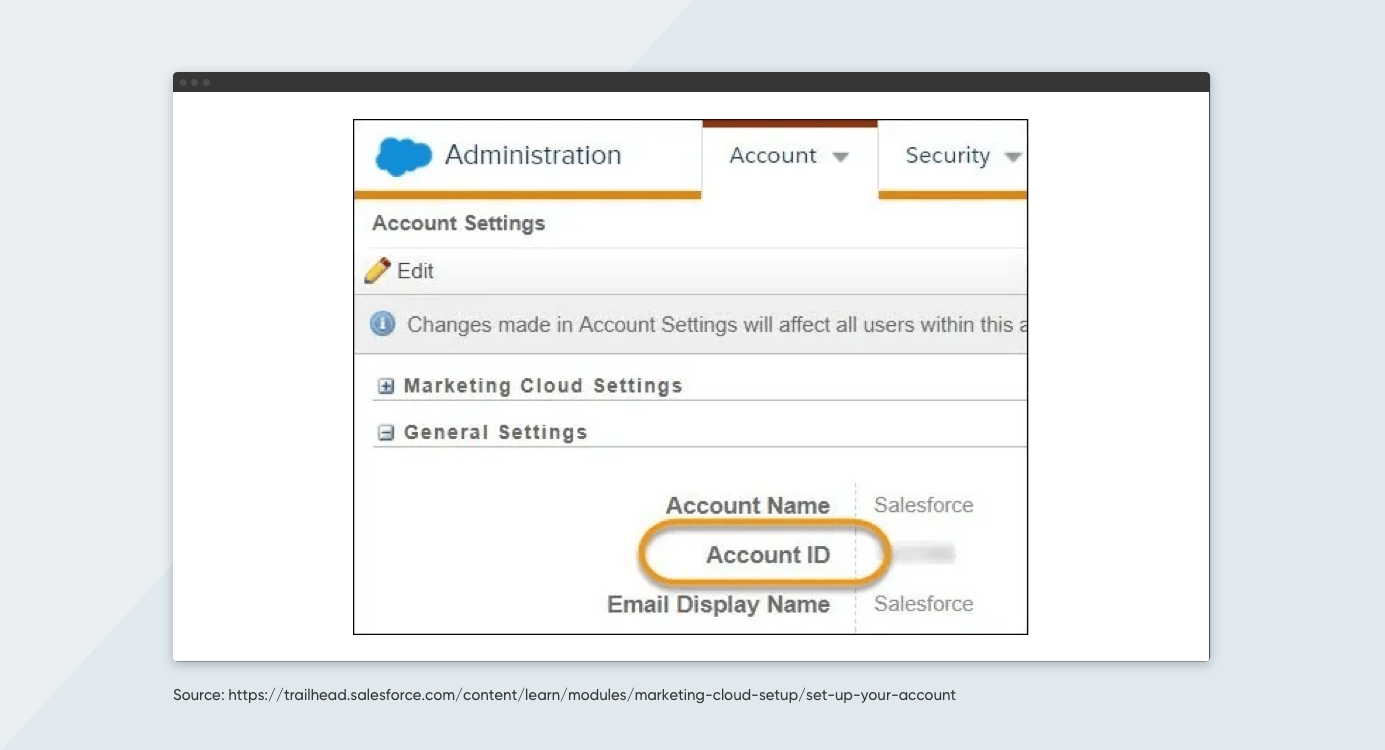
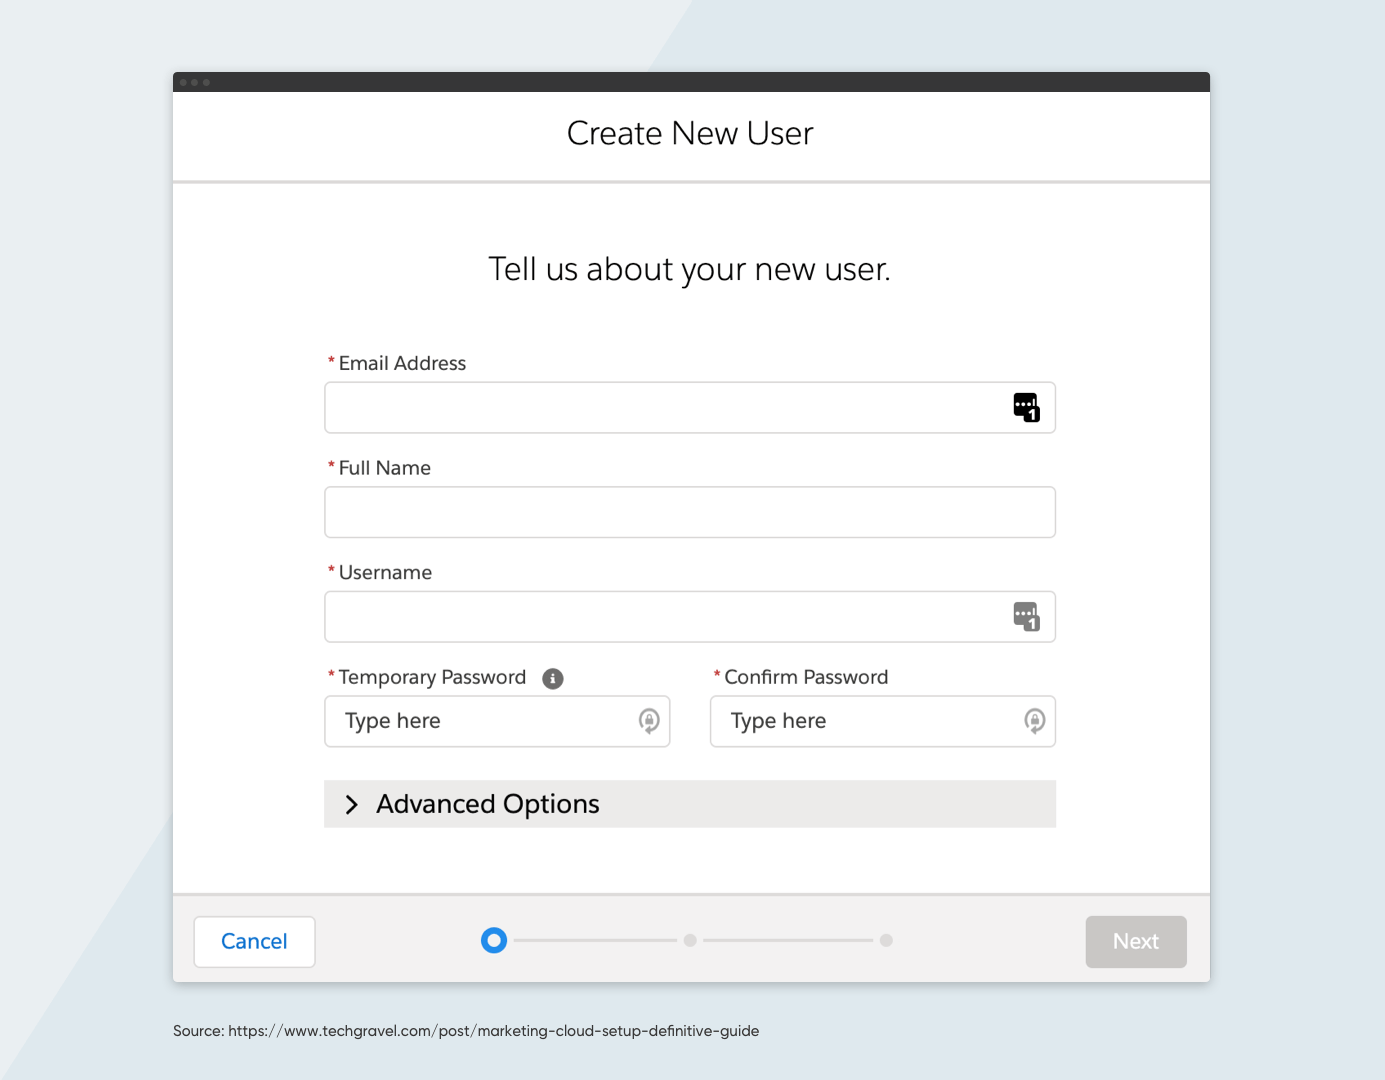
Organizations can also create a new user by clicking on the “Create” option in the Home window and filling in the required details.

Step 3: Approving IP Addresses
Organizations must approve the IP addresses and include them in the allowlist. It is advisable to add all the IP addresses from the local region. This will allow users to log in from anywhere without disruptions and switch between primary or secondary instances.
Step 4: Configuring Business Units
To create the business unit, navigate to the create button available within the “Business Unit” option.
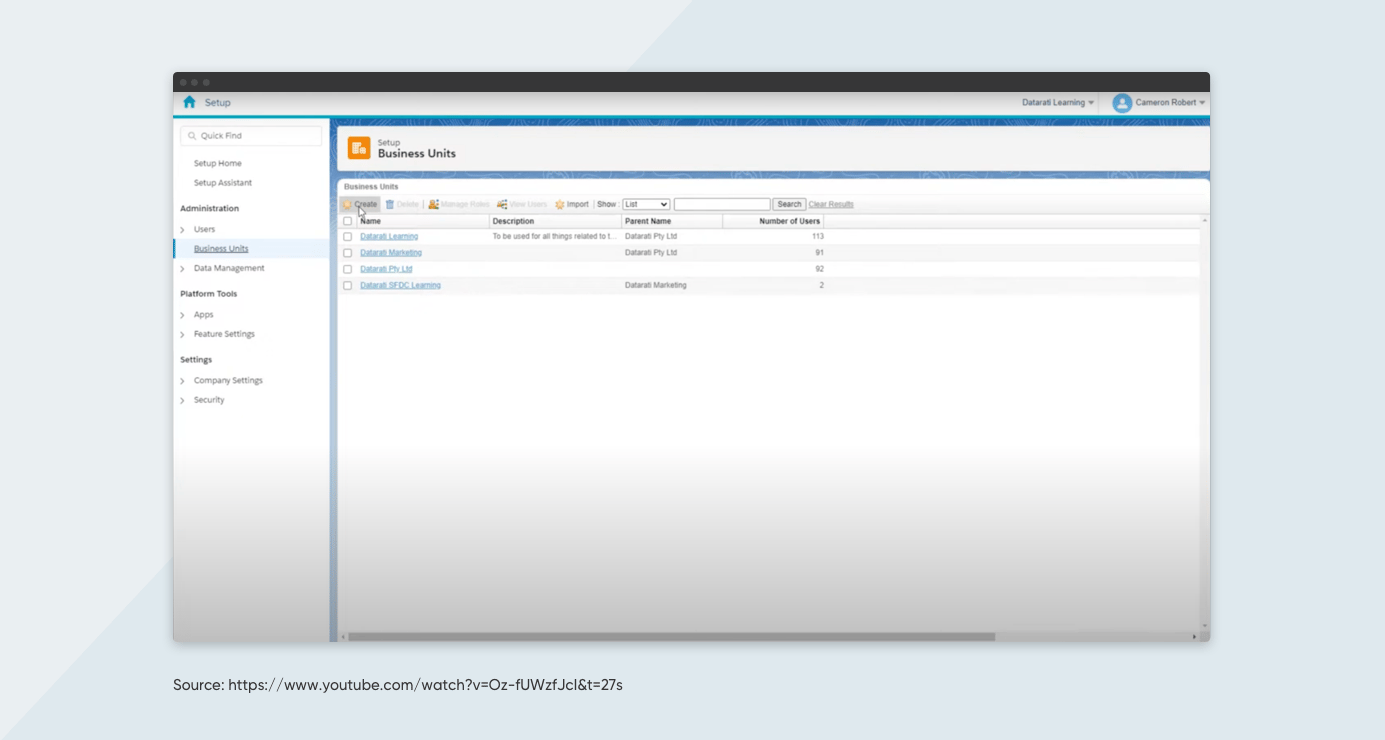
After this, fill in all the required fields before clicking on the save button.
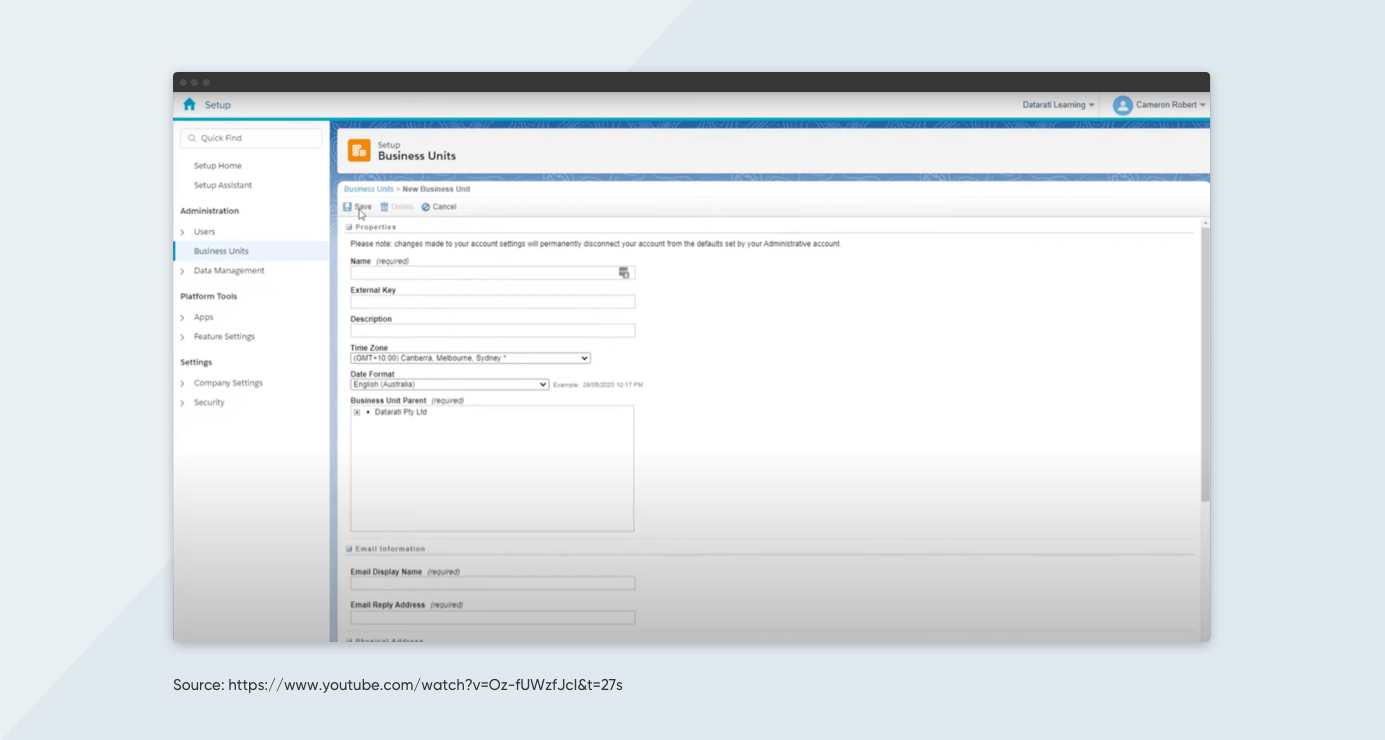
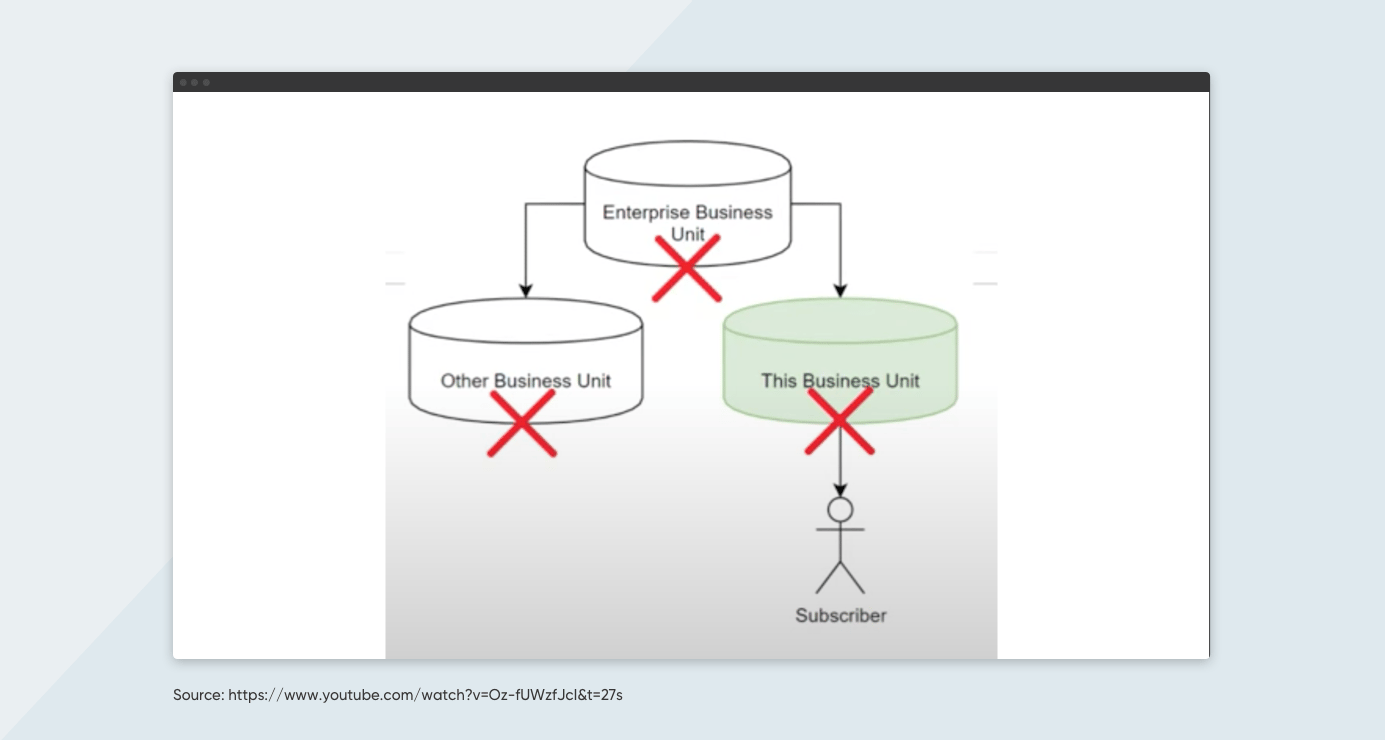
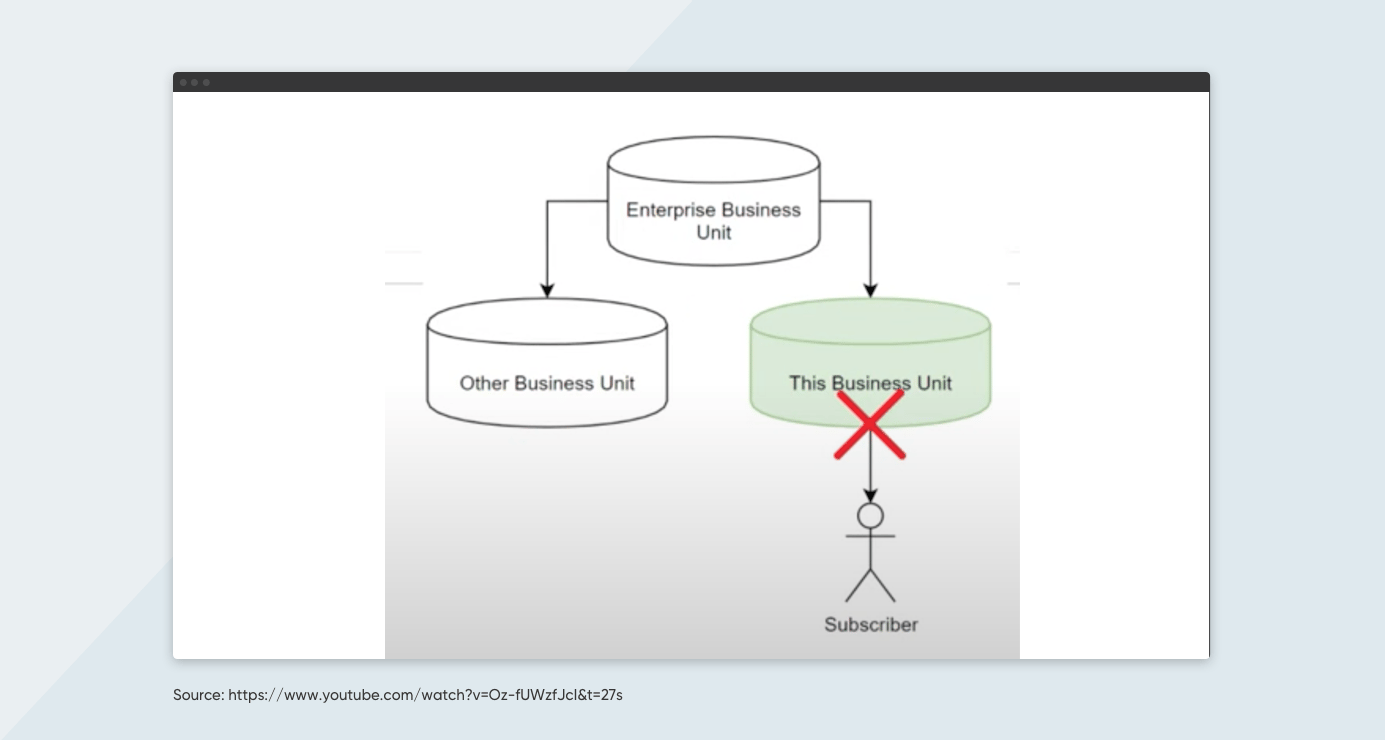
Organizations must pay proper attention to the “unsubscribe settings” options at the bottom.
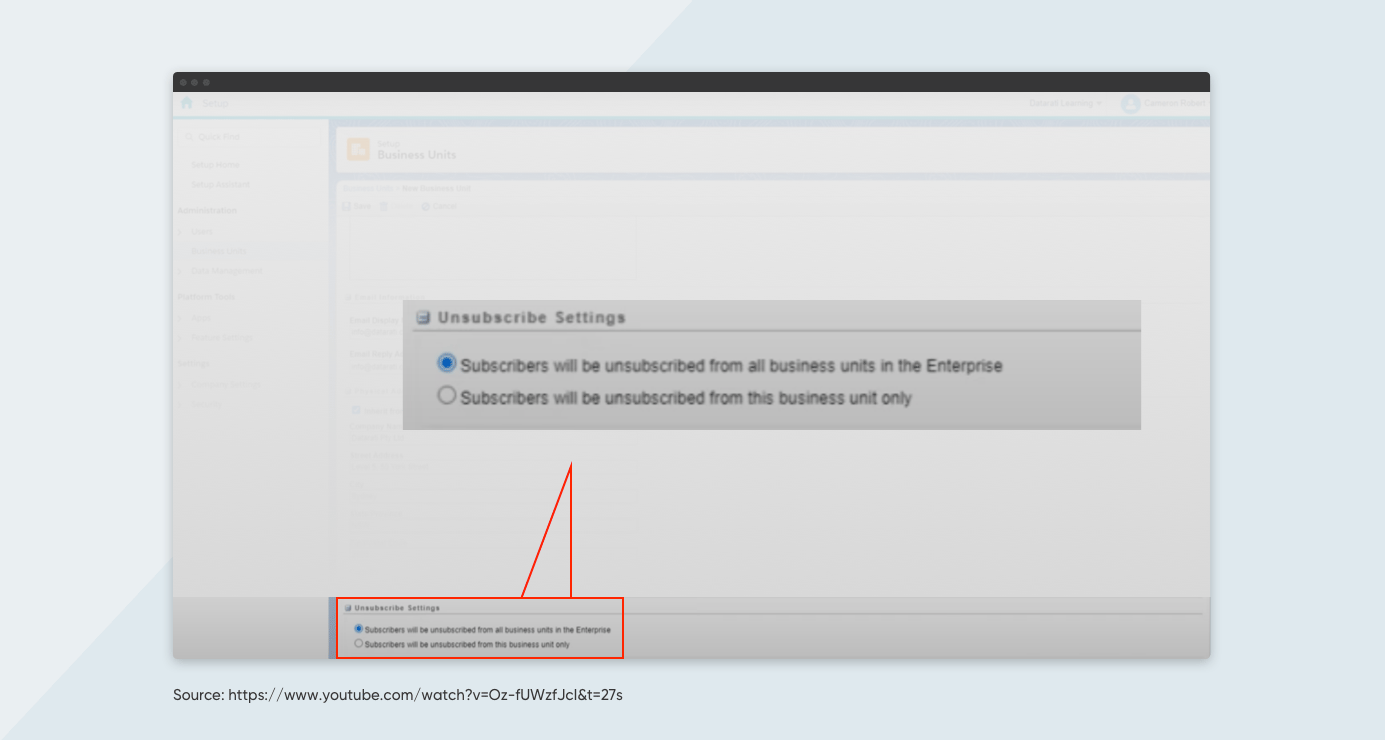
With Option 1, subscribers will be unsubscribed from all the business units of the enterprise.
With Option 2, subscribers will only be unsubscribed from this business unit.
Step 5: Creating FTP Accounts
SFMC uses Secure File Transfer Protocol (SFTP) to securely access, transfer, and manage large files and sensitive data. Add new FTP users by navigating to the “FTP Accounts” option available in the “Data Management” tab of the “Administration” menu. 
Organizations can also refer to Salesforce’s Setup Assistant whenever they are stuck with any of the above steps.
Phase 2: Setting Up Salesforce Marketing Cloud Data Modeling
After the initial account setup, the next step is to enable data collection, retention, and analysis. This will happen by setting up Salesforce Marketing Cloud Data Modeling.
Step 1: Enabling Marketing Cloud Connect
Marketing Cloud Connect combines the digital marketing capabilities of Marketing Cloud with the Salesforce data management, segmentation, and campaign management tools. Organizations must configure the Marketing Cloud Connect as per their requirements.
Step 2: Creating Data Extensions
Data extensions are tables consisting of user data. Organizations can use this data to run queries or pull information. Data extensions can be used with Email Studio and Contact Builder. All the permissions, sharing, and other functionalities of data extensions are present within the Email Studio.
Follow these steps to set up data extensions.
Step 3: Using SQL Queries
Structured Query Language (SQL) is a domain-specific language that helps extract rich data from Marketing Cloud Engagement data extensions and Contact Builder. The following SQL commands are used in SFMCE.
- SELECT: Used to locate the required data on a database.
- FROM: Location where data reside within Marketing Cloud Engagement. It is usually a data extension.
- JOIN: Allows the query to search multiple tables and/or data extensions.
- WHERE: Used to filter out data required/not required.
The following code snippet can be used to implement SQL Queries within SFMCE.

Phase 3: Configuring Email Studio
Configure Email Studio to ensure the proper deliverability of email marketing campaigns.
Step 1: Configuring Email Admin Settings
Configure the Email Admin Settings using the Setup Assistant. These settings control the permissions required for creating the email content, running the campaigns, and measuring the engagement metrics.
Step 2: Setting Up Sender and Delivery Profiles
Define sender details like name and email address within sender profiles. To create a sender profile, navigate to the ’Profiles’ option in the ‘Marketing Setup’ menu. Fill in all the crucial information, including the name, description, and external key.
Delivery profiles help determine the delivery locations, including the headers/footers and IP addresses. Create a delivery profile by navigating to the ‘Delivery Profile’ option in the ‘Marketing Setup’ menu.
Phase 4: Implementing Other Tools
Organizations should also implement the following components of Salesforce Marketing Cloud Engagement.
Content Builder
Content Builder links, consolidates, and organizes data from all Salesforce Marketing Cloud tools and external sources. It provides a unified view of all forms of customer interactions with the brand.
The Import Assistant of Content Builder helps import content from Classic Content. Content Builder also helps organizations organize the imported content and search for specific content within the templates.
Organizations can use the Content Editor to create, edit, and test the email content in a single workflow.
Follow these steps to create your first email within Content Builder.
Journey Builder
Salesforce Marketing Cloud's Journey Builder has a user-friendly interface that enables organizations to build tailored customer journeys. Organizations can seamlessly craft the complete customer journey, spanning from initial engagement to final interaction.
The ‘Entry Sources’ tell Journey Builder where the customers are coming from to join the journey. Using ‘Canvas Activity,’ organizations can incorporate actions, decisions, or both to guide the customers to the endpoint of the journey.
Read more to start building customer journeys within Salesforce Journey Builder.
CloudPages
CloudPages in Salesforce Marketing Cloud publishes targeted content to customers across multiple channels.
To get started with CloudPages, Salesforce Marketing Cloud Engagement admins have to toggle the required permissions as per the engagement role.
|
Permission |
Description |
|
Access |
Allow access to CloudPages |
|
View |
Allow content viewing |
|
Create |
Allow content creation based on the Engagement edition |
|
Edit |
Allow editing and saving the existing content |
|
Delete |
Allow deleting content and folders |
|
Publish/Unpublish |
Allow content publishing and unpublishing |
Next, use folders in SFMCE to organize the CloudPages information based on the target destination.
Follow the CloudPages data-handling and security best practices to protect subscriber data.
Feeling Overwhelmed? Axelerant’s Salesforce Experts Can Help
Implementing Salesforce Marketing Cloud is difficult. There are hundreds of well-defined steps that might be overwhelming.
Axelerant can help as your Salesforce implementation partner to set up and optimize Marketing Cloud.

Abhishek Tripathi, DXP Consultant
Abhi likes to contribute to society, learns new skills from Trailhead, and when away from his desk, he spends quality time with his kids and helps out his wife and mother. When engaged, challenged, and appreciated at work, he’s unstoppable.
%20copy.png)
Sayan Mallick, Marketing Assistant
A former professional e-sports player, passionate about anime and technology—that’s Sayan. He is an eccentric explorer who likes to read, play games, teach, and spend time with his pet dog, Buddy.

Simran Sethi, Marketing Associate
Simran is an avid reader. She is an active runner, who also likes to swim, dance, and sing. For her, the meaning of life lies in the little things. Kindness, passion, and compassion are her life’s essential values.
 We respect your privacy. Your information is safe.


Leave us a comment