What is Scheduler and how does it work?
A lightning_scheduler is a module that provides a flexible way to schedule your content. It gives content editors the ability to perform scheduled operations like publishing or archiving/unpublishing any content type at a specific date or time in the future. You can enable Scheduler for all content types per your need and also define the roles which would have access to the scheduler functionality. Scheduler also allows you to schedule workflow state transitions to take place systematically at a future date and time.
Getting started with Scheduler
To use the lightning_scheduler module, you’ll need to follow the steps below:
1. Install Scheduler: To Install Scheduler, navigate to Manage -> Extend and search for Scheduler in the list of modules. Check the checkbox and click “Install”.

2. Enable Scheduler: To enable Scheduler for a content type, navigate to Manage -> Structure > Content types, select the content type for which you need to enable Scheduler and check the checkbox “Enable scheduled publishing for this content type”. This can be repeated for all the content types for which scheduled publishing is needed.

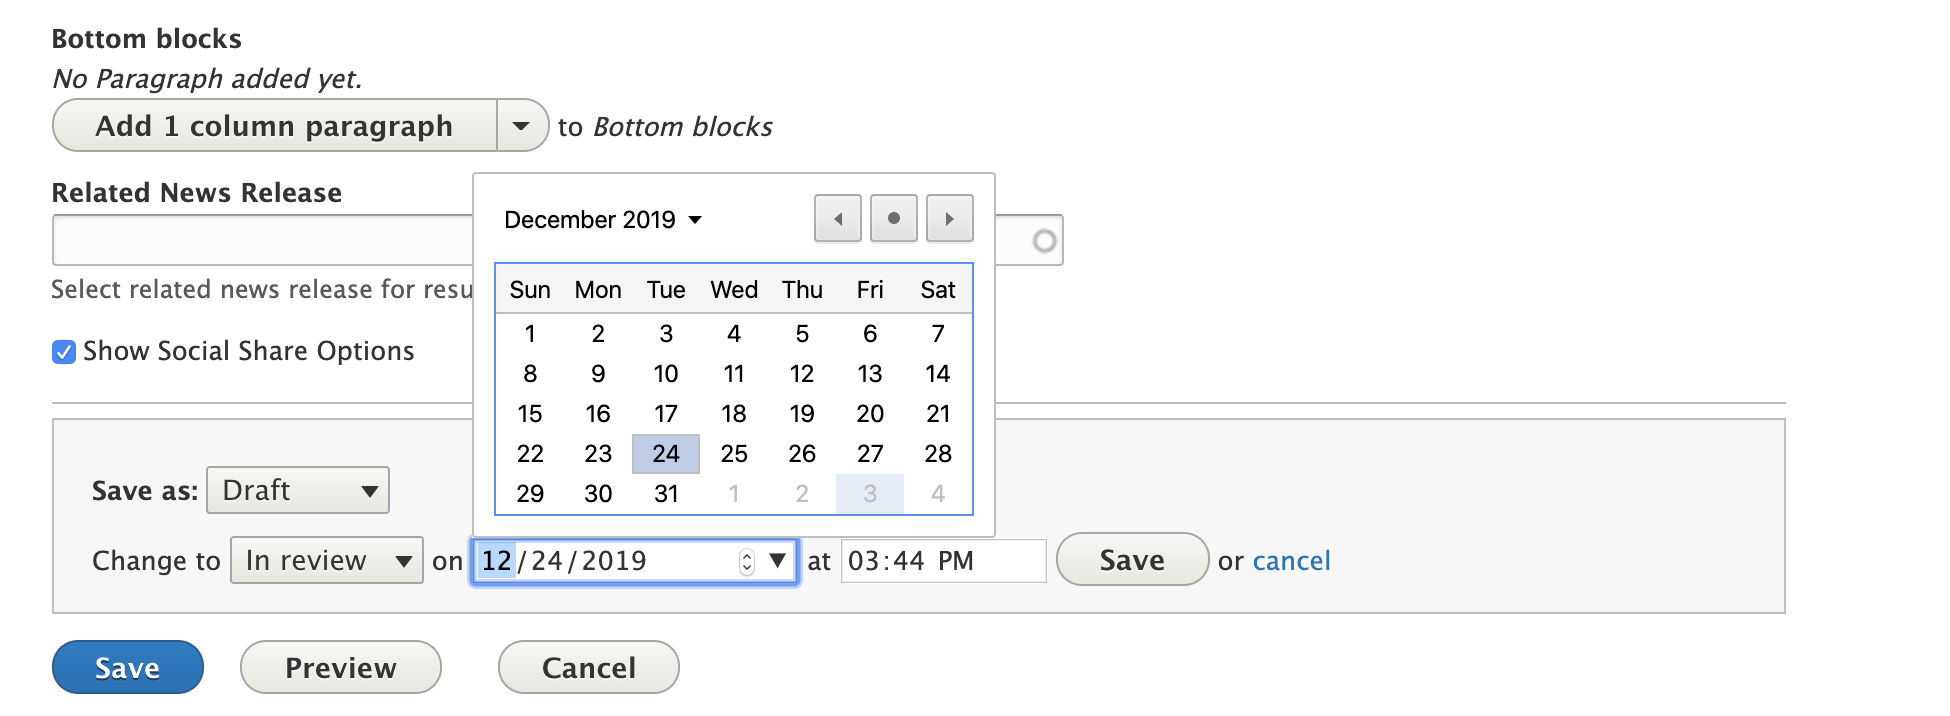
3. Configure Scheduler: Once scheduling is enabled, you’ll be able to see an option to schedule a status change in the node edit form. Select a value from the “Change to” field, enter a valid date and time, and click “Save”. The content would then be configured to undergo a state change at the specified date and time.
Scheduler Permissions
You may give your content editor the necessary permissions to schedule and view scheduled content publications. The module declares different permissions like “View scheduled content list”, “Schedule content publication” and “Administer Scheduler”.
Scheduling Content
Scheduler for content which is not part of a workflow: To create a scheduled transition for any content for which scheduler is enabled, you simply need to click the “Schedule a status change” link and choose the appropriate moderation state, set the date and time for the transition, and save the scheduled moderation state. The content should undergo a change in moderation state on the date and at the time specified.


Scheduler for content which is part of a workflow: Scheduler allows us to schedule workflow state transitions to take place systematically at a future date and time. We can schedule multiple state transitions at once. But the state transitions added must follow the state transition workflow defined.
For example, if the workflow defined is Draft > In review > Published > Archived and the editor tries to schedule a state transition from Draft > Published, then the moderation state of the content will not be changed as it does not follow the defined workflow.

Scheduler for translated content (multilingual sites): Scheduler does not work for translated content by default. But it can be set for translated content also with some custom coding so that it is synced across all the translations.
This was implemented in one of our projects where configuring Scheduler was required for translations as well. When translations are added to the original/source content, scheduling a state transition for one language should automatically apply the same moderation settings to all other translations. The translated nodes should also undergo state transitions along with the source node on the scheduled date and time.

Pre-requisites for successful scheduling
The cron setting must be decided and configured correctly depending on how frequently you want your content to be updated, to ensure that scheduled changes reflect on time without fail.
For example, if the cron is scheduled for every hour, then the content state will be changed to the next state only if both cron is executed and the scheduled time has passed. Let us say that the cron executed at 10 AM and the content is scheduled for 10.30 AM. In this case, the content will be picked up only during the next cron run. If the content is required immediately, then cron can be executed manually.

QA checklist for testing the Scheduler module
Apart from the points mentioned above, these are some of the key areas to look out for while testing the Scheduler module:
- Verify whether Scheduler is working for all the translated nodes (if there are translations).
- Verify whether the scheduled state change is happening at the scheduled time. Is there any time difference between the set time and the actual state change time?
- Verify whether Scheduler is working for both new content and existing content when using Scheduler multiple times.
- Verify whether Scheduler works as expected on scheduling multiple state transitions to a node in one go, and whether this is applied for both source node and all the translated nodes without skipping any moderation state.
Conclusion
The Scheduler module helps improve the experience of content editors by giving them the ability to automatically publish or unpublish an article or piece of content at a given date and time. But its dependence on cron for its scheduling may create some issues if cron settings are not configured correctly.


 We respect your privacy. Your information is safe.


Leave us a comment